Simple Restorative Eats

Image

For the last week I have been doing a fairly intensive cleanse, new year, new start. Right?  Cleansing is a very personal thing, some people like it and do it – some people don’t.  A girlfriend at work and myself have been successfully cleansing and fasting for a number of days now… by that I mean it feels like ten. Ridding our bodies of the old and helping to boost rejuvenation.   The cleansing battle has been a bit up and down for me, considering I have a slight food obsession and this particular program includes a five days of no solids. How does a food blogger… quit food? Quit juicing.  Quit…. it all.  It’s been an adventure, lets say that.  

Before beginning the cleanse I spent a lot of time brainstorming how to properly use up the remaining items in my fridge and how to break the fast in a way that would be satiating as well as gentle. The recommended options stated in the cleanse are an apple for breakfast, a salad for lunch and if that goes well – another salad at dinner.    Well that’s all good, fine, quite tolerable.  However, for someone like me who eats an abundance of fermented foods, I have noticed a dramatic change in my inner self with not having any added happy friendly bacteria.

Image

So I have decided to rebel.  I am not going to break the fast with salads, an apple – sure, a green juice instead of a salad and a niiiccee warm bowl of miso soup.  I don’t love soy, honestly I don’t even like soy. I generally try to avoid it, with the occasional exception of some tempeh and a tub of miso paste that calls the top shelf of my refrigerator home.  There are so many debates about soy, so many.  For a very informative and objective look at some of the debates head on over to the Holy Kale, take a read. Decide for yourself if you want to use it and include it.   Like I said, I have a whole shwack load of friendly ferments in my daily life – so miso works for me on occasion.   Occasions… such as this, where I would really like to gently reintroduce semi solids and send my digestive system back into orbit with some fermenty friends.  The thing to remember when making miso, is that in order to get the full benefit of those bacteria it needs to be warm not hot. Scalding those little loves will do no good, so be careful when mixing it up!

Image

Can’t have miso soup… without just a few little steamed gyoza. Right? So easy once you get the hang of it, knowing that after a bowl of miso I would be dying for at least a couple… I made a batch of 20 and froze them. I have a previous post about making gyoza so I won’t delve deeply into my love for little steamed pockets. Maybe the fact that I am doing a second dumpling ish post says enough! These ones are just mushroom, no tempeh or kale. 

Image

I chose to steam the gyoza, limit the frying and why bother with the baking.  Simple is best, plus I love cooking with water and steam.  This cleanse taught me an incredible amount of just how gentle the system is, while being so strong and resilient at the same time. It’s amazing! Truly a wonder.  My own body has gone on a round about ride up and down between feeling good and feeling like crap, I will be happy to have some real food again. That’s for sure.  Steam, because it’s simple and it’s healthy. No added oils or splatter burns.  Just some quick cooking love.

Image

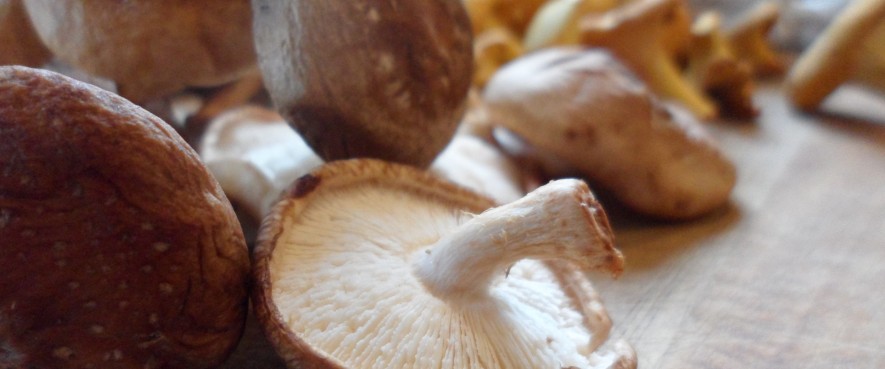
Although I have a burning love for shiitakes on a regular day, I chose to use only these little delights for my come back soup.  Shiitakes support healthy stomach function, are incredibly restorative and are great immune regulators.  Medicinal mushrooms, gotta love ’em! They also look beautiful and ever so traditional in a simple miso broth.  Floating perfectly in place of small pressed tofu cubes!

Shiitake Miso
(makes two bowls)

2.5 Cups of Water
1 Handful of Shiitake Mushrooms
2 Green Onions
1 Tsp Tamari
1.5-2 Tbsp Shiro Miso Paste
Sea Veg & Pea Shoots 

In a medium sized pot, boil the water and the mushrooms. Cook at medium heat for about 5-8 minutes with the lid on. Slice and add the green onion continuing to cook for a minute or so before turning the burner off and adding the tamari. Remove the pot from the stove completely, then scoop out about 2/3 of the mushroom water (liquid only) leaving the lid off and allowing it to cool down slightly, putting it in a soup bowl. Stir the miso paste in the 2/3 of mushroom water until it’s fully dissolved. Once the pot is no longer steaming visibly, add the miso water into the pot and give it a good stir.  Top with nori or other sea veg and some fresh pea shoots.

Mushroom Gyoza 
(makes about twenty)

1/3 Cup Water
2 Cups of Oyster Mushrooms
1 Cup of Shiitake Mushrooms
0.5-2 Tsp Fresh Grated Ginger
1 Green Onion
1 Tbsp Tamari
Splash of Rice Vinegar
Salt & Pepper 
Wonton Wraps

In a large pan or wok, cook the mushrooms in the water until the mushrooms are soft and the liquid has disappeared. Allow the mixture to cool, and then blend in a food processor until it forms a paste like texture. Add the ginger – to taste, sliced green onion, tamari, rice vinegar, salt and pepper. Blend it again to make sure it’s fully mixed. Scoop out half a teaspoon to a teaspoon of filling into the middle of a wrapper, wet the edges and fold! Easy peasy, I promise, once you do a couple you’ll fly through it.  For a more detailed explanation of wrappers and folding check out my previous gyoza post.

Dipping Sauce

2 Parts Rice Vinegar
1 Part Sesame Oil
As many heaps of chili flakes as desired

Image

Pockets of bliss

Image

One of my favorite things in the whole food world…  is a dumpling.  A couple of years ago, my roommate and I would crave them.. all. of. the. time.  Seriously. We would debate going to get some sort of Asian takeout, really just to satisfy the craving for one dish. Recently my love for these little stuffed pockets of delight has gotten a bit out of hand, I have been debating making a batch and keeping them for random days of craving for quite some time.      Between volunteering my weekends away and spending time with people I cherish  – I just haven’t found the gap in my schedule…  until this weekend.

Step one:  Master a simple sauce that would simply enhance the flavor of the filling.  This is key, my perfect sauce is smooth and warm, with some spice and some tang.  I find sesame oil to be perfect in the sense of smooth and warm…  toasted sesame is almost buttery at times, so the oil is right on point.  As for the spice and tang, some chili and a little rice vinegar are what brings it all together.

Image

Chili Oil

1/3 Cup Sesame Oil
1/4 Cup Grapeseed Oil
2-3 Tbsp Dried Chili (Use fresh if available and in season)

Super simple… get ready…  Heat the oils in a pan over fairly high heat, add the chili. No need to stir or swirl or anything, just let them sizzle for a couple seconds and then remove from the heat. Let the oil cool in the pan and transfer to an airtight container – best kept in the fridge for freshness.

Image

Step Two:  If possible, the best way to get maximum flavor is to grind whatever spices you care to use – fresh.  Whole spices are always so much better, the essential oils are released when ground and then begin to dissipate very quickly! Lucky for me…  I recently found an antique grinder that is basically my new best friend. I have a number of mills and grinders…. but this one…  well its older. So, of course I am naturally drawn to it.

Image

So whole spices.. I used cumin seeds, coriander and Szechuan peppercorns.  Szechuan peppercorns are one of my very favorite spices, they are fruity, citrusy, with a little bit of a punch. Absolutely a delight on the palate!

Image

Pop the spices in the grinder…   spin spin spin…  and the powder is collected in the bottom. Beautiful and aromatic.  The spices I chose are fairly simple, nothing too complex, nothing too hot. Remember, the chili oil is meant to enhance the filling so you don’t need a whole lot of heat inside the dumpling!

Image

Step Three:  The filling! Most places have a pork and a vegetarian. Typically cabbage, carrot..  sometimes rice noodles even. I wanted to get a boost of protein in mine, without the meat…  So I opted for something a little different. The bulk of the filling is made from kale, mushrooms and tempeh.  Soy is not something I ever go for, but tempeh is a bit different. Traditionally, an Indonesian form of protein tempeh is made by splitting and fermenting the soybeans.  The protein content is super easily assimilated within the body, and is about 50% more than a hamburger.  The important part about tempeh is the fermentation, that fermentation allows for enzymes within the tempeh and therefore aided digestion once consumed.  Why not make it easier on our bellies, eh?

Image

Step four:  Wrappers.  There are so many different types that you can buy in stores, and it is also super easy to make your own.   I bought mine, because I happened across a pack that is both vegan and gluten free.  Hooray for rice flour!  I think ultimately the easiest thing you can do when picking which type of wrapper to use….  is go with one that’s round. I have used round, square, and made my own – and the biggest factor for me personally is shape. The square are just that much harder to fold.

Image

Step five: Finding out how much filling to put on each wrapper….  this is trial and error. There are so many factors when the filling and the wrapper finally come together.  You can’t have a wet filling.. your wrapper will disintegrate. I find that it is best to use two wrapper skins, one is too thin and easily tears while three is way too thick. One teaspoon in a round wrapper maybe perfect, but for squares I would suggest slightly less than a teaspoon (at least until you’ve got the hang of folding them)

Image

Steamed Vegan Dumplings

1.5 Cups of Kale – torn
1 Large Portabello Mushroom
1/2 Cup Shiitake Mushrooms
2 Squares of Unflavored Tempeh
1/2 Cup Roughly Chopped Fennel
3 Green Onions
5-6 Cloves of Garlic
Knuckle Size Knob of Ginger
Ground Coriander, Cumin & Szechuan Pepper
1 Tbsp Grapeseed Oil
1/2 Cup Water
2 Tbsp Tamari
1 Tsp Rice Vinegar
1 Tsp Raw Sugar
Package of Vegan Wrappers

First get everything prepped… Chop the mushrooms, tempeh, fennel, garlic and green onion. In a large pan or wok gently toast the spices until aromatic, transfer them to a grinder and spin away until a fine powder is produced (If using preground spices, toast the powder very quickly, then add the grapeseed oil). Transfer back to the wok and add in the oil. Grate the knob of ginger into the wok and toss in 2/3 of the garlic. Turn the heat down closer to medium and add in the mushrooms with 1/4 cup of water. Cover and allow the mushrooms to steam.  Once they have started to soften, add the kale and the tempeh along with extra water if you need it, return the lid and continue to steam. Once the mushrooms are soft and the kale wilted, add the fennel and turn the heat off. You want the intensity of the fennel to diminish slightly, while leaving it with a bit of crunch. While it continues to steam a few more seconds, mix the tamari, rice vinegar, remaining garlic, and green onions together in a bowl, add the sugar last.  Once the wok mixture is cool, transfer it to a food processor.  If you want your filling to resemble a pork type dumpling, whirl it around in the food processor until it begins to form a paste. I personally wanted some texture, so I only sent it spinning for a couple of rounds. While in the food processor, add the tamari mixture. If you find the filling to be too crumbly, add some water but only 1/2 teaspoon at a time.  Once you have your desired consistency… it’s time to wrap!  On a flat, clean and dry surface, double up two skins for thickness and lay out 3 or 4 wrapper squares at a time. Experiment with how much filling to use if you’d like, but I suggest starting as I said earlier… with just slightly less than a teaspoon.  Place the filling in the middle of the square and then fold up the south corner to north, forming a triangle. Gently wet your finger tips and begin folding pleats in the wrapper up one side, to the point, and down the other. If you find your wrapper pops open in spots, just seal it together with a bit more water.  Place your dumplings on some wax paper and continue folding until all the filling has been used.

Image

Now, I prefer to steam my dumplings…  so line a bamboo steamer with a couple pieces of lettuce or some more wax paper..  being sure that steam will be able to come through the slats, don’t just cover the entire base. Place over a boiling pot and allow to steam until the dough is gleaming and has darkened.

Image

To serve, mix about 2 parts chili oil to 1 part rice vinegar and that’s it! Ready to be enjoyed!

Image

Image